Tuesday, December 21, 2010

Egypt & Mummies Unit/ Making Pharaoh Masks & Barbie Mummies!

Okay so I know I am WAY behind in my keeping you all up on our homeschooling journey this year, but if I was regularly posting like I would truly like to be, I would have to question my time spent with the kids.  I seriously don't know how to find the time for this, but I am trying hard as I see it as a journaling/digital scrapbooking sort of record of what we are doing.  Allan (the geek) also enjoys it as he is off to work and misses so much of what we do.  

So here we are, covering in December something we learned in October (oh well!) ...here it is!  This has to be the funnest unit we have done this year and we learned SO MUCH!  First, I talked to the kids about the fun things we were going to do that week as we learned.  I mentioned to them how excited I was for us to make Pharaoh masks and Barbie doll mummies.  My boys were as excited as I--- but my 7 year old, Cayleigh was upset at the idea of making monsters out of pretty dolls, even after I explained we wouldn't be using hers and would pick up some at the dollar store just for this project.  It was more about the fact that "mummies were monsters" in her eyes.  When we began learning about mummies and why they did it, she came to understand that they were not monsters at all.  They were usually royalty-- well cared for and very loved people that believed by doing these things, they were protecting and preserving their bodies for the afterlife.  They did mummification out of love.  Once she realized that, she was sold.  YAY!

Next,  I found all the National Geographic Documentaries I could find on the Pharaohs, Pyramids and Mummies.  My kids are very visual learners so this really helps to set the tone for what we are learning.  I also rummaged up some books like the Magic Tree House and the Usborne Book of World History.  These books were EXACTLY what I needed to cover the basics without overwhelming with too much info for their little (but genius) minds. hehe  


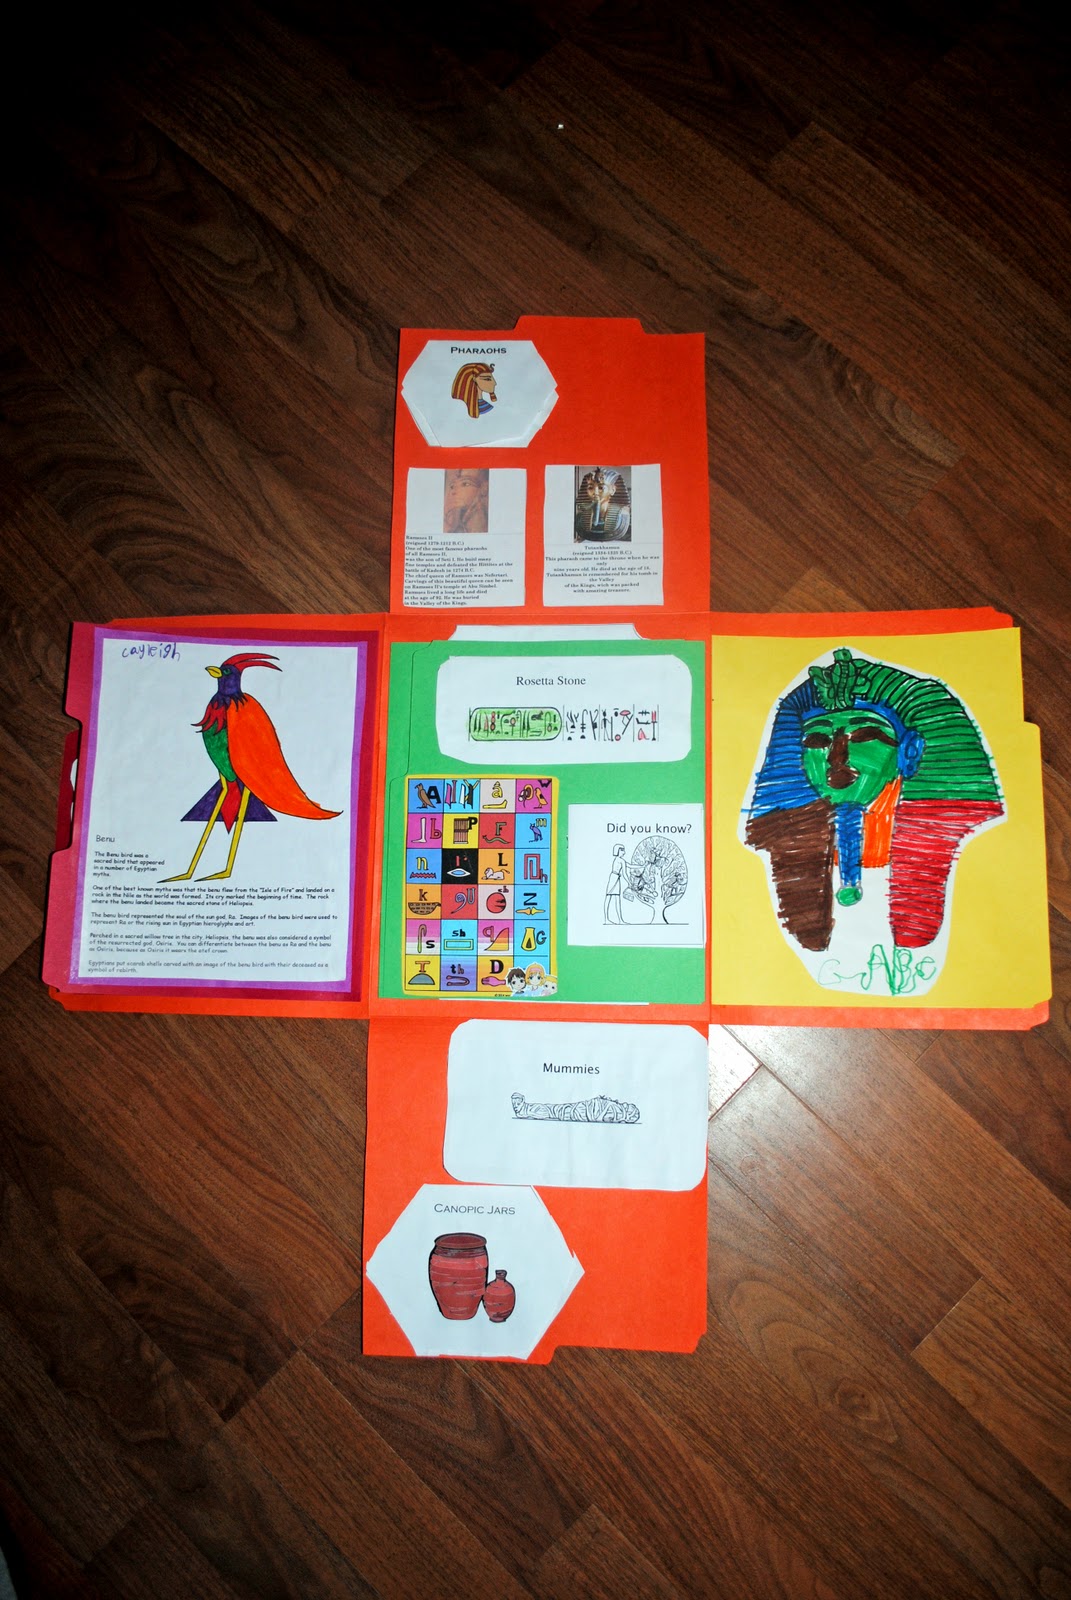
I found this great free lapbook template for Ancient Egypt and assigned each of the kids different pieces to the book.  I had one draw pictures of examples for thier mini-book, another would be researching info on the computer about their mini-book, another would be cutting, folding and gluing minibooks together.  It's a team effort so we can end up with a nice take away from our unit.  I always have them sign their name on/in the mini book they did so we can later see who contributed what to each book we make. Below are some pictures of our Egypt lapbook.  We are very proud of the effort that went into this one.  


 During our unit, we had plenty of art/craft time to try to recreate some of our own Egyptian artifacts.  :-)  First, we made our very own pharaoh masks.  The kids proudly hung them in the classroom.  I don't think they are going anywhere anytime soon.  LOL
Below are the basics to how we made them (and how much fun we had making them :-) )

Logan stirring the flour paper mache mixture....
Another benefit of homeschooling...no uniforms, LOL!
Okay I had to include this one...even though my kids have NEVER seen a Friday the 13th movie, they know this mask represents a scary character named "Jason".  They were killin me with the funny re-inactments of "Jason goes to Egypt"!  LOL.  So yes, this was what I found at the dollar store to give me a base to make our pharoah masks.  We hot glued the paper cut out to the inside of it and went to town tearing and gluing strips of paper to our masks.
Yes, it was VERY messy!  But FUN, I swear!
The finished result of DAY 1.  I did use laminated placemats to help cut down some of the mess and also to give it something that would (hopefully) peel off okay the next day without doing too much damage.  
Now, just to let them dry :-)  
DAY 2:  Logan hard at work with the gold spray paint (and yes, it became an obsession...gold sprayed EVERYTHING!...we'll talk about that in another post altogether, lol)
Finished Project, 2 coats of Gold Spray paint...now (you guessed it) DRY! Yes!  Onto the hand painting...
Cayleigh begins her Diva masterpiece...
Gabe makes his tribal version...

Logan stays very traditional.

After that, we HAD to make our Barbie Mummies!  Check out our exciting step by step of that super fun process...


Then we waited 40 days...(not really, we waited 40 minutes to simulate). 


We learned after our pharaoh masks that we prefer the glue solution to the flour solution as the flour paste makes an odd smell and can attract little bugs in warm weather.  We will be using a glue/water solution for all future paper mache type projects.  
 And for my usual ending Tori post....what did Tori get herself into this week?
Dried Indian corn of course! It was our sensory table theme for the fall in our craft room and I think it's safe to say that she REALLY likes it.  :-)


Friday, December 3, 2010

Melissa & Doug Deal of the Day!


Can I just say how thrilled I am to have found this deal?! Had to share in hopes to help many of you find these great prices in time for Christmas for your little ones!  I already had the decorate cupcakes on my littlest one's list, and I've been eyeing that tiered special occasion cake since my 7 year old played with it at the Parent Teacher Store the entire time I shopped...so HALF PRICE seemed pretty great to me!  Plus I get FREE shipping with Amazon Prime.  Yes, I went a little crazy on this one!  I also found the little horses that my daughter was begging for one day.  We are going to have such a FUN Christmas!  My kids already LOVE the sets we have like the Pizza, sushi and fruit cutting sets.  They love the velcro attachements and play with them for hours in our play kitchen.  HAVE FUN, this one is TODAY ONLY!!
      

Monday, November 15, 2010

Tori's First Break

Alright, I have one older child that is familiar with the term "break a leg" because he enjoys acting and may actually pursue a career in it one day.  My 18 month old on the other hand learned the term quite literally about a week ago when her sweet older brother, Gabe was holding her and accidentally fell.  Somehow I don't think she was wanting to pursue an acting career at the time.  

Poor little gal, I had no idea it was broken until the following day since it happened at night and I put her to bed after consoling her.  It was when i put her down in the morning that I quickly realized what had happened.  Poor thing fell straight to the ground, she couldn't put an ounce of pressure on that leg.  Dang, I felt horrible that she suffered all night with that pain and I didn't have a clue.  It's times like these I really wish they would come out of the birth canal talking.  :-( In any case, I took her to a new local children's hospital that I absolutely fell in love with that day.  They diagnosed her with a broken tibia and splinted her.  They don't believe in casting the first week in Louisville, so let's just say it has been a VERY long week (hence the Facebook countdown, so sorry for the confusion, Britt!! LOL)
The kids loved the mini door sized just for them.  Tori loved their version of kid wheelchairs.  Allan ended up picking one up for the house for her as well, hehe!

It's now been a week and they are ready to cast my little diva.  So off we go to the Children's Orthopedic Doctor today and this is what we ended up with.  

The splint comes off...
Waterproof Liner...
On goes the hot pink layer...
Adding the Diva's sparkles
adding the finishing touches!
End result...for my little punk princess!
Her fashionable and function-able (waterproof) cast! :-)

Dang this thing is HEAVY!!  We'll see how well she lugs this thing around. I sure hope she can figure it out, my back can't handle all the lifting anymore! 

The good news:  Doc thinks this will be a quick heal --- 3-5 weeks instead of the initial 6-8 weeks we were told by the ER doc.  :-)

**Fingers crossed** 

Tuesday, November 9, 2010

Homeschool Human Skeleton Unit Study...Dem Bones, Dem Bones!


Okay, well we didn't really intend for our Homeschool to be based on unit studies, but after how wonderfully our 50 states study went, I realized rather quickly that this was the way to go with my group.  So here we are in October and I am thinking of nothing more than HALLOWEEN!  Yes, many of you know that it is my favorite time of year.  I met my husband at a Halloween convention,  mind you!  So naturally our unit studies this month will revolve around this fun time of year!  The first week we decided to theme it SKELETONS so we learned all about the bones in our body.  I first begin my units by searching Google for any and all ideas for my topic and then printouts, art project, math studies, etc. Then I search all the kids bookcases for books relating to the subject (yes, we have a lot of books...so far, we haven't had to go to the library!) We did wonderful, we found our Dr. Frankenstein's Human Body book (my oldest LOVES this book!) 

as well as our Usborne Human Body book.  Both had alot of information about bones.


  Next, we headed  for the dollar store and bought two class mascots (a small, plastic skeleton and a large cardboard skeleton).  We played lots of games online regarding the human skeleton and found all the numerical points to remember about the bones in our body, (12 ribs on each side=24, 33 vertebrae in our spine, 206 bones in out body by adulthood about 270 as a baby, etc.) we focused on those numbers alot for math pieces.  We learned all the names of the bones (both common and scientific) and Logan was really good at remembering the scientific names as well as the common while Cayleigh & Gabe were able to focus mainly on the common names at their age and learning level (example...mandible=jawbone, patella=kneecap). At the end of the week, we played a game to see if they could name every bone on our class mascot, "Bucky"...I was going to award the one who knew the most a prize, but to my delight, they all knew at least the common name for all of them!  They were ALL winners!!


We made a Human Bones Lapbook.  This is a great way I can keep/showcase each of the kids work on each unit. I can give out various assignments on our  subject and at the end of the unit, we compile, organize and assemble our favorite handouts into our lapbook. Some of the information we find is best to print, cut and paste (especially for the younger kids to get involved) while others are artistic representations altogether.  Many things my oldest son has found he likes to type up himself and print and cut as he really likes to type.  It doesn't bother me much as long as it's a good mix of print, type and art from all my kids.  Even the typing and printing enhances their computer skills.
I love lapbooks because they fold up neatly and can be placed on a bookshelf. They don't always work for every unit as we used a 3 ring binder for our 50 states unit and made laminated pages for each state (2 sided) with state flag, flower, bird, capitals, etc. on one side and the state quarter with interesting facts on the other)...that would have been WAY TOO BIG for a lapbook.  The idea for us is to have some kind of "take-away" for each unit.  It will likely grow into much more in the future, but lapbooks are fun, easy and small.  There are also lapbook kits that can be found online if you don't feel like braving one yourself.  We may start offering these ourselves when we find the time and energy to do so (free, of course).  We can also use them as a review tool when we want to review a particular subject or perhaps delve deeper into that topic.  Here are some photos of our hard work :)


Oh, and I can't forget the ever promised photo of what fun Tori found herself in this week while we were busy learning, LOL......


Not sure if she passed or failed on this one...LOL!  What do you think??

Tunes


Get a playlist! Standalone player Get Ringtones